Troubleshooting "Lag" in OBS Studio
Hey! This post was intentionally delisted for being boring, inaccurate, outdated, or any combination of the three. I've left it up for archival purposes, but keep the context in mind!
OBS is updated regularly and this is MAD OLD. Trust in the autoconfig wizard!
Continue at your own risk!
OBS problems are actually pretty easy to diagnose once you know your way around. With that said, if you can only describe your issue with “OBS is lagging”, you’re gonna have a shitty time searching through the support forums.
This is a quick guide I threw together to take people through some basic troubleshooting on their own. It’s not complete by any means: there are a lot of ways you can fuck up your settings to produce shitty video, and if I could cover them all here, there would probably be an official guide by now. But if you’re running into issues with choppy or hitching video, this is an okay place to start.
Logging
The first step in diagnosis is a clean log. Close OBS, then open it up again and start a recording or streaming session. You want your problem to occur in this session, so that you can check the log for anything out of the ordinary: if your stutters are rare, you might need to wait for a while.
Once your test session is done, stop the recording and/or stream, and leave OBS open. Go to Help > Log Files > View Current Log. Scroll to the bottom. You should see a few lines that look something like this—don’t worry if one or two are missing, or they don’t look exactly the same.
00:01:45.904: Output 'simple_stream': Number of skipped frames due to encoding lag: 4 (0.0%)
00:01:45.904: Output 'simple_stream': Number of lagged frames due to rendering lag/stalls: 154 (0.0%)
00:01:45.904: Output 'simple_stream': Number of dropped frames due to insufficient bandwidth/connection stalls: 30 (0.0%)
If none of these lines are present, then your test didn’t have any problems, and you’ll need to do another one to get any information.
Each line corresponds to a different problem affecting the video. The number and percentage at the end of the line shows how many frames were affected. If a problem affected less than 0.1% of frames, it’s usually a non-issue. Otherwise, tackle these starting with the highest percentage first.
Skipped frames
If you’re using x264, the default encoder, skipped frames occur when your CPU maxes out and can’t encode the video fast enough. This is usually because your CPU is too weak to handle the encoding settings you’re using, but other misbehaving programs or sources can also cause this.
The easiest way to check for misbehaving sources is to create a clean scene collection, from Scene Collections > New, and test with nothing but your primary capture source. If you’re no longer skipping frames, a source on your original scene is probably the culprit.
If you’re using a camera that doesn’t take up your entire scene, you can reduce the resolution from the source’s Properties to free up some resources. Changing the camera’s Video Format might also help, though it may affect image quality or framerate. Browser sources can also hog resources, especially if they’re loading heavy or animated pages. USB capture cards can eat a lot of CPU as well, but in my experience, there’s not much you can do about that.
If you’re still skipping frames, the only way around it is to reduce your encoding load. For streaming, lowering your resolution or framerate is usually the best bet. Keep in mind that there’s basically no reason to stream at 1080p ever, since the bitrate will make it look like shit outside of very low-motion content. If you’re taking your framerate down from 60, don’t pick half-assed numbers like 45 or you’ll cause frame pacing issues. Remember to adjust your bitrate to match the changes you make.
If you’re locally recording with a variable bitrate, changing your encoder settings can reduce your CPU load by a lot. If you’re streaming, you can still technically do this, but the quality hit at low bitrates is pretty hard. I’d only use it as a last resort: your mileage may vary.
Changing encoder settings
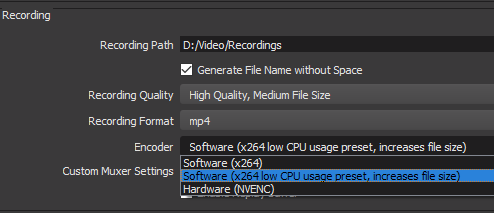
Your first option is to use a faster x264 preset. This will heavily reduce your CPU load, but it creates much larger files, and looks much worse at the low bitrates typical for streaming. To try it, go to Settings > Output and make sure your Output Mode is set to Simple. Select High or Indistinguishable Quality under Recording Quality. A dropdown labeled “Encoder” will appear, and you can select the low CPU usage preset from there.
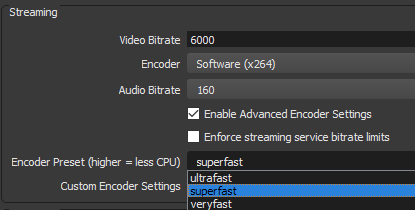
For streaming, you’ll need to check “Enable Advanced Encoder Settings” in the Streaming section. Set the Encoder Preset to “superfast”. If it still isn’t enough, you can try “ultrafast”, but your video is almost guaranteed to be nearly unwatchable.
The other option is to use a hardware encoder. Like the name says, this relies on your hardware—you’ll need a recent Intel CPU to use Quick Sync, a recent NVIDIA GPU to use NVENC, or a recent AMD GPU to use VCE. These all use dedicated encoders on your CPU or GPU, so you’ll barely see any load at all, but they’re usually just as inefficient as x264 on faster presets, if not worse.
In theory, if your hardware supports it, selecting these is as easy as picking them from the Encoder dropdown. In practice, you might have to make some configuration changes for OBS to see your hardware correctly, which is beyond the scope of this guide.
Lagged frames
OBS uses your GPU to put together each frame of video before encoding. If you’re getting lagged frames, it usually means your GPU is struggling under heavy load, bottlenecking the rendering process.
This usually happens when recording games. If your game has an unlimited or unlocked framerate, setting a reasonable cap can free up enough resources for OBS to do its job. If not, there might be something else that’s using your GPU: the usual culprits are browsers, chat clients, and the Battle.net launcher. You can check your GPU usage with any number of free utilities; a quick Google search should find one that works for you.
On weak GPUs, you might just need to reduce your resolution or graphics settings in-game to take some load off. I’ve also heard reports of heavily filtered or misbehaving sources causing this, but I haven’t run into it myself. If you can’t pin down the cause, it never hurts to check.
Dropped frames
Dropped frames are a streaming-related problem, and they won’t affect recordings. If your connection to your streaming service stutters or slows down, you might not be able to send frames as fast as you’re encoding them. Small amounts of dropped frames will look like short stalls in the video. Large amounts will cause the stream to buffer for your viewers.
The OBS forums have a complete guide to dealing with dropped frames: everything that you can possibly do is here, and for tenacious problems, it’s worth going through the list. The TL;DR: don’t use WiFi, use TwitchTest to make sure your bitrate isn’t too high and your connection is stable, and try changing your ingest server or testing on other services.
This is not a problem you can always solve: some ISPs are too shit to stream with, and some connections are too slow to serve watchable video. If something is acting up along your route, your best bet is to call your ISP and complain, but don’t expect miracles.
That’s basically it. If you’re still having problems after trying all of this, or if your problem wasn’t covered here, try the OBS Support forums or the community IRC channel. Remember to post a clean log with your issue, and remember: these guys are volunteers, so don’t act like a shithead.
Good luck!